

오늘 포스팅은 Deeplearning.ai에서 최근에 나온 따끈따끈한 코스를 소개해드리는 내용입니다! Andew Ng 선생님께서는 정말 쉬지를 않는군요..😂 덕분에 공부해야 할 것이 매일매일 추가되고 있습니다. 열심히 따라가 보도록 하겠습니다.
https://www.deeplearning.ai/short-courses/evaluating-debugging-generative-ai/
Evaluating and Debugging Generative AI
Machine learning and AI projects require managing diverse data sources, vast data volumes, model and parameter development, and conducting numerous test and evaluation experiments. Overseeing and tracking these aspects of a program can quickly become an ov
www.deeplearning.ai
오늘 소개해 드릴 "Evaluating and Debugging Generative AI" 코스는 1시간 정도의 길이의 짧은 코스로 부담없이 들으실 수 있습니다. 강력한 MLOps Tool인 WandB(W&B)를 사용해서 Generative AI의 성능을 높이고, 디버깅하는 방법을 배울 수 있습니다.
1. WandB란?
WandB는 무엇일까요? WandB, 혹은 W&B라고 하는 이 도구는, 머신러닝 실험을 추적하고, 더 나은 성능의 모델을 빠르게 개발하는데 도움을 줍니다. WandB를 사용하여 모델 훈련 도중 하이퍼파라미터 튜닝에 따른 서로 다른 실험들을 손쉽게 비교하고 분석할 수 있습니다. 또한, 시각화 기능을 통해 각 실험의 성능을 직관적으로 확인할 수 있습니다. 아래 그림은 WandB 문서에서 가져온 실험 예시입니다. 각 실험은 다른 색상으로 표시되어, 한눈에 실험 별 성능을 확인할 수 있습니다.

이 코스에서는 W&B의 기본적인 소개부터 시작하여, 간단한 튜토리얼을 통해 W&B를 코드에 적용하는 방법까지 알려줍니다. 저는 이미 W&B를 사용해 본 경험이 있어서, 이 초기 부분은 빠르게 넘겼습니다. 만약 W&B에 대해 더 알고 싶다면, 공식 홈페이지에 게시된 quickstart 가이드를 참고하거나, 이 코스의 초기 강의인 "Evaluating Diffusion Models"를 참조하시면 좋습니다. 하지만, 본 포스팅은 W&B를 LLM의 검증과 모니터링에 어떻게 활용하는지에 대한 부분(LLM Evaluation and Tracing with W&B)을 다루도록 하겠습니다.
2. LLM Evaluation with W&B
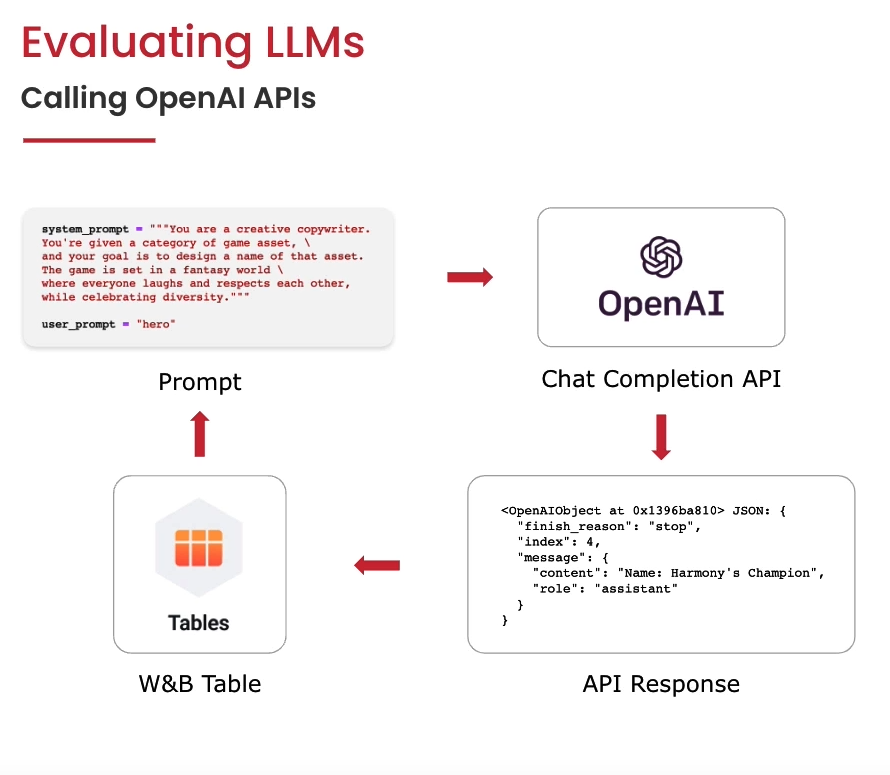
이 강의에서 흥미로웠던 점은 기존 W&B가 아래 그림과 같이 모델을 훈련할 때, loss와 accuracy 등을 차트로 보여주는 기능을 넘어, LLM의 Generations 혹은 LLM chain에 대한 시각화를 보여준다는 점이었습니다.

정의한 System_prompt와 user_prompt를 Open AI API에 입력하고, API response를 W&B Table에서 바로 확인할 수 있습니다. W&B Table에서는 다양한 형식의 모델 Output을 직접 확인하고, 모델들의 성능을 비교해 볼 수 있습니다.
LLM의 Output이 어떻게 W&B Table에 표시되는지 알아보기 위해, 코스에서 제공하는 튜토리얼을 따라가보겠습니다. 튜토리얼은 해당 코스의 Jupyter Notebook에서 가능합니다.
import os
import random
import time
import datetime

import openai

from tenacity import (
    retry,
    stop_after_attempt,
    wait_random_exponential, # for exponential backoff
)
import wandb
from wandb.sdk.data_types.trace_tree import Trace
먼저 필요한 라이브러리들을 불러옵니다. 해당 튜토리얼에서는 openai의 gpt-3.5-turbo 모델을 사용하여 wandb table에 모델의 결과물을 보여주기 때문에, 두 라이브러리 모두 불러와 줍니다.
# get openai API key
import os
import openai
import sys
sys.path.append('../..')

from dotenv import load_dotenv, find_dotenv
_ = load_dotenv(find_dotenv()) # read local .env file

openai.api_key  = os.environ['OPENAI_API_KEY']
해당 노트북의 로컬 .env 파일에 있는 OPEN_API_KEY를 불러온 후,
PROJECT = "dlai_llm"
MODEL_NAME = "gpt-3.5-turbo"
프로젝트의 이름과 모델 이름을 정의합니다. 이 튜토리얼에서는 game assets를 위한 이름을 생성하기 위해 OpenAI LLM을 사용합니다.
wandb.login(anonymous="allow")W&B를 사용하기 위해 노트북에서 W&B에 로그인합니다. 해당 코드를 실행하면, 아래와 같이 2가지의 옵션이 나오는데, 1을 선택하면 private 한 계정을 사용하고, 2번을 선택하면 자신의 W&B 계정을 사용합니다. 원하는 번호를 선택하여, 입력창에 입력하고 쉬프트 엔터를 통해 로그인하거나 private W&B dashboard를 사용합니다. 그 후 wandb 초기화를 정의합니다.

run = wandb.init(project=PROJECT, job_type="generation")
아래는 OpenAI "ChatCompletion"을 사용해서 프로젝트 "Generating names for our game assets", 즉 "게임 자산을 위한 이름 생성하기"를 위한 코드입니다.
@retry(wait=wait_random_exponential(min=1, max=60), stop=stop_after_attempt(6))
def completion_with_backoff(**kwargs):
    return openai.ChatCompletion.create(**kwargs)

def generate_and_print(system_prompt, user_prompt, table, n=5):
    messages=[
            {"role": "system", "content": system_prompt},
            {"role": "user", "content": user_prompt},
        ]
    start_time = time.time()
    responses = completion_with_backoff(
        model=MODEL_NAME,
        messages=messages,
        n = n,
        )
    elapsed_time = time.time() - start_time
    for response in responses.choices:
        generation = response.message.content
        print(generation)
    table.add_data(system_prompt,
                user_prompt,
                [response.message.content for response in responses.choices],
                elapsed_time,
                datetime.datetime.fromtimestamp(responses.created),
                responses.model,
                responses.usage.prompt_tokens,
                responses.usage.completion_tokens,
                responses.usage.total_tokens
                )
해당 모델을 위한 system_prompt를 정의해줍니다. system_prompt는 모델에게 역할을 부여하고, 어떤 결과물을 생성할 것인지 정의합니다. system_prompt를 자세하고 구체적으로 작성할수록 생성물의 결과가 좋게 나올 수 있기 때문에, 신중하게 작성해야 합니다.
system_prompt = """You are a creative copywriter.
You're given a category of game asset, \
and your goal is to design a name of that asset.
The game is set in a fantasy world \
where everyone laughs and respects each other,
while celebrating diversity."""
그리고 저희가 보고 싶은 W&B Table의 Colums를 정의해 줍니다.
# Define W&B Table to store generations
columns = ["system_prompt", "user_prompt", "generations", "elapsed_time", "timestamp",\
            "model", "prompt_tokens", "completion_tokens", "total_tokens"]
table = wandb.Table(columns=columns)
원하는 주제를 입력해 모델에게 system_prompt와 user_prompt를 동시에 입력으로 줍니다. user_prompt를 "hero"라고 해보겠습니다.
user_prompt = "hero"
generate_and_print(system_prompt, user_prompt, table)

wandb.log({"simple_generations": table})
run.finish()
코드를 실행시키면, 실행 결과를 볼 수 있는 창이 생성됩니다. system_prompt, user_prompt, generation이 각각 표 형식으로 잘 정리되어 있습니다. 그 밖에도 elapsed_time, model, total_tokens 등 LLM을 사용한 생성에 대한 내용을 한눈에 볼 수 있습니다.

그 밖에도 표에 row를 추가하여, 원하는 값을 추가할 수도 있습니다. 예를 들어, total_tokens와 토큰 당 가격을 곱해 cost라는 칼럼을 만들 수 있습니다. cost 칼럼은 OpenAI API를 사용할 때의 가격을 짐작할 수 있습니다.

3. LLM Tracing with W&B
LLM Chain을 통해 좀 더 창의적인 결과물을 생성할 수 있습니다. LLM chain은 대표적으로는 LangChain이 있는데, 이 내용은 추후에 포스팅하도록 하고, 오늘은 기본적인 LLM chain을 직접 디자인하도록 하겠습니다.
Simple LLM chain은 Fantasy world를 랜덤으로 뽑고, 그다음 캐릭터 이름을 생성하는 역할을 수행합니다. 먼저 Fantasy World를 List 형태로 정의합니다.
worlds = [
    "a mystic medieval island inhabited by intelligent and funny frogs",
    "a modern castle sitting on top of a volcano in a faraway galaxy",
    "a digital world inhabited by friendly machine learning engineers"
]
그다음, 모델의 이름과, Temperature, system_message를 정의합니다. 모델은 gpt-3.5-turbo를 사용합니다. Temperature은 모델의 생성물이 얼마나 창의적인지 결정하는 파라미터로, 높을수록 더 창조적인 결과물을 생성합니다. system_message는 LLM에게 "Creative copywriter"가 되도록 요구합니다.
# define your config
model_name = "gpt-3.5-turbo"
temperature = 0.7
system_message = """You are a creative copywriter.
You're given a category of game asset and a fantasy world.
Your goal is to design a name of that asset.
Provide the resulting name only, no additional description.
Single name, max 3 words output, remember!"""
다음은 creative_chain이라는 이름의 LLM chain을 만드는 코드입니다. 먼저 fantasy world를 주어진 worlds 리스트에서 랜덤으로 뽑은 후, fantasy world를 설명하는 prompt를 구성합니다. Root_span에 Tool span과 LLM span을 추가한 후, response text를 생성하도록 합니다.
def run_creative_chain(query):
    # part 1 - a chain is started...
    start_time_ms = round(datetime.datetime.now().timestamp() * 1000)

    root_span = Trace(
          name="MyCreativeChain",
          kind="chain",
          start_time_ms=start_time_ms,
          metadata={"user": "student_1"},
          model_dict={"_kind": "CreativeChain"}
          )

    # part 2 - your chain picks a fantasy world
    time.sleep(3)
    world = random.choice(worlds)
    expanded_prompt = f'Game asset category: {query}; fantasy world description: {world}'
    tool_end_time_ms = round(datetime.datetime.now().timestamp() * 1000)

    # create a Tool span
    tool_span = Trace(
          name="WorldPicker",
          kind="tool",
          status_code="success",
          start_time_ms=start_time_ms,
          end_time_ms=tool_end_time_ms,
          inputs={"input": query},
          outputs={"result": expanded_prompt},
          model_dict={"_kind": "tool", "num_worlds": len(worlds)}
          )

    # add the TOOL span as a child of the root
    root_span.add_child(tool_span)

    # part 3 - the LLMChain calls an OpenAI LLM...
    messages=[
      {"role": "system", "content": system_message},
      {"role": "user", "content": expanded_prompt}
    ]

    response = completion_with_backoff(model=model_name,
                                       messages=messages,
                                       max_tokens=12,
                                       temperature=temperature)

    llm_end_time_ms = round(datetime.datetime.now().timestamp() * 1000)
    response_text = response["choices"][0]["message"]["content"]
    token_usage = response["usage"].to_dict()

    llm_span = Trace(
          name="OpenAI",
          kind="llm",
          status_code="success",
          metadata={"temperature":temperature,
                    "token_usage": token_usage,
                    "model_name":model_name},
          start_time_ms=tool_end_time_ms,
          end_time_ms=llm_end_time_ms,
          inputs={"system_prompt":system_message, "query":expanded_prompt},
          outputs={"response": response_text},
          model_dict={"_kind": "Openai", "engine": response["model"], "model": response["object"]}
          )

    # add the LLM span as a child of the Chain span...
    root_span.add_child(llm_span)

    # update the end time of the Chain span
    root_span.add_inputs_and_outputs(
          inputs={"query":query},
          outputs={"response": response_text})

    # update the Chain span's end time
    root_span.end_time_ms = llm_end_time_ms


    # part 4 - log all spans to W&B by logging the root span
    root_span.log(name="creative_trace")
    print(f"Result: {response_text}")
# Let's start a new wandb run
wandb.init(project=PROJECT, job_type="generation")
위의 코드를 돌리면, WandB project를 볼 수 있는 창이 생성됩니다. 이제 game asset 카테고리를 입력으로 주어, LLM의 생성 결과물을 살펴봅니다.
run_creative_chain("hero")
run_creative_chain("jewel")
wandb.finish()
모델의 입력에 따라 생성된 결과물을 보여주고 있습니다.

Trace Timeline을 통해 Creativechain이 어떤 식으로 LLM을 동작시켰는지 tracing 해볼 수 있습니다. OpenAI API의 Inputs에는 system_prompt와 query가 들어갔는데, 각각 지정해 준 system prompt와 Chain에서 만들어준 query의 내용이 담겨 있습니다. Outputs에는 LLM이 생성한 response가 있습니다.

4. Evaluating LLMs with W&B
W&B로 Langchain Agent, 튜토리얼에서는 ReAct Agent를 tracking 할 수 있습니다. ReAct Agent는 말 그대로 반응(React)하는 에이전트를 말합니다. ReAct는 Reasoning, Actions, Observations의 세 부분으로 나눠져 이해할 수 있습니다. Resoning에서 에이전트는 주어진 상황과 가지고 있는 정보를 바탕으로 무엇을 해야 할지 판단합니다. 이는 문제 해결을 위한 첫걸음으로, 어떤 목표를 달성하기 위해 어떤 전략을 세워야 할지를 결정하는 단계입니다. Actions에서는 추론 과정을 통해 세운 전략을 바탕으로 행동합니다. 이때 사용되는 도구나 기술 등은 행동의 한 부분입니다. Observations에서는 행동을 실행한 후 그 결과를 관찰하고, 배워서 앞으로 어떻게 행동해야 하는지에 대한 중요한 피드백을 제공하며, 이를 통해 에이전트는 더 효과적인 Reasoning과 Actions를 할 수 있습니다.

먼저 Agent를 구성하기 위해 필요한 라이브러리를 불러옵니다.
# Import things that are needed generically
from langchain.agents import AgentType, initialize_agent
from langchain.chat_models import ChatOpenAI
from langchain.tools import BaseTool

from typing import Optional

from langchain.callbacks.manager import (
    AsyncCallbackManagerForToolRun,
    CallbackManagerForToolRun,
)
wandb.init(project=PROJECT, job_type="generation")
WandB tracing을 위해 LANGCHAIN_WANDB_TRACING을 true로 설정합니다.
os.environ["LANGCHAIN_WANDB_TRACING"] = "true"
WorldPickerTool과 NameValidatorTool을 각각 정의합니다. WorldPickerTool은 worlds에 있는 fantasy world 중 하나를 랜덤하게 뽑는 도구이고, NameValidatorTool은 LLM이 생성한 이름이 적절한 형식인지 검증하는 도구입니다.
class WorldPickerTool(BaseTool):
    name = "pick_world"
    description = "pick a virtual game world for your character or item naming"
    worlds = [
                "a mystic medieval island inhabited by intelligent and funny frogs",
                "a modern anthill featuring a cyber-ant queen and her cyber-ant-workers",
                "a digital world inhabited by friendly machine learning engineers"
            ]

    def _run(
        self, query: str, run_manager: Optional[CallbackManagerForToolRun] = None
    ) -> str:
        """Use the tool."""
        time.sleep(1)
        return random.choice(self.worlds)

    async def _arun(
        self, query: str, run_manager: Optional[AsyncCallbackManagerForToolRun] = None
    ) -> str:
        """Use the tool asynchronously."""
        raise NotImplementedError("pick_world does not support async")

class NameValidatorTool(BaseTool):
    name = "validate_name"
    description = "validate if the name is properly generated"

    def _run(
        self, query: str, run_manager: Optional[CallbackManagerForToolRun] = None
    ) -> str:
        """Use the tool."""
        time.sleep(1)
        if len(query) < 20:
            return f"This is a correct name: {query}"
        else:
            return f"This name is too long. It should be shorter than 20 characters."

    async def _arun(
        self, query: str, run_manager: Optional[AsyncCallbackManagerForToolRun] = None
    ) -> str:
        """Use the tool asynchronously."""
        raise NotImplementedError("validate_name does not support async")
위의 함수를 작성한 후, ChatOpenAI API를 정의해 줍니다.
llm = ChatOpenAI(temperature=0.7)
Agent는 WorldPickerTool과 NameValidatorTool 두 가지를 사용합니다. initialize_agent를 통해 tools, llm을 넣어 agent를 생성해 줍니다.
tools = [WorldPickerTool(), NameValidatorTool()]
agent = initialize_agent(
    tools,
    llm,
    agent=AgentType.ZERO_SHOT_REACT_DESCRIPTION,
    handle_parsing_errors=True,
    verbose=True
)
이제 agent를 사용해 봅니다. agent에게 virtual game world를 찾고, 그곳의 hero name을 찾도록 명령합니다.
agent.run(
    "Find a virtual game world for me and imagine the name of a hero in that world"
)
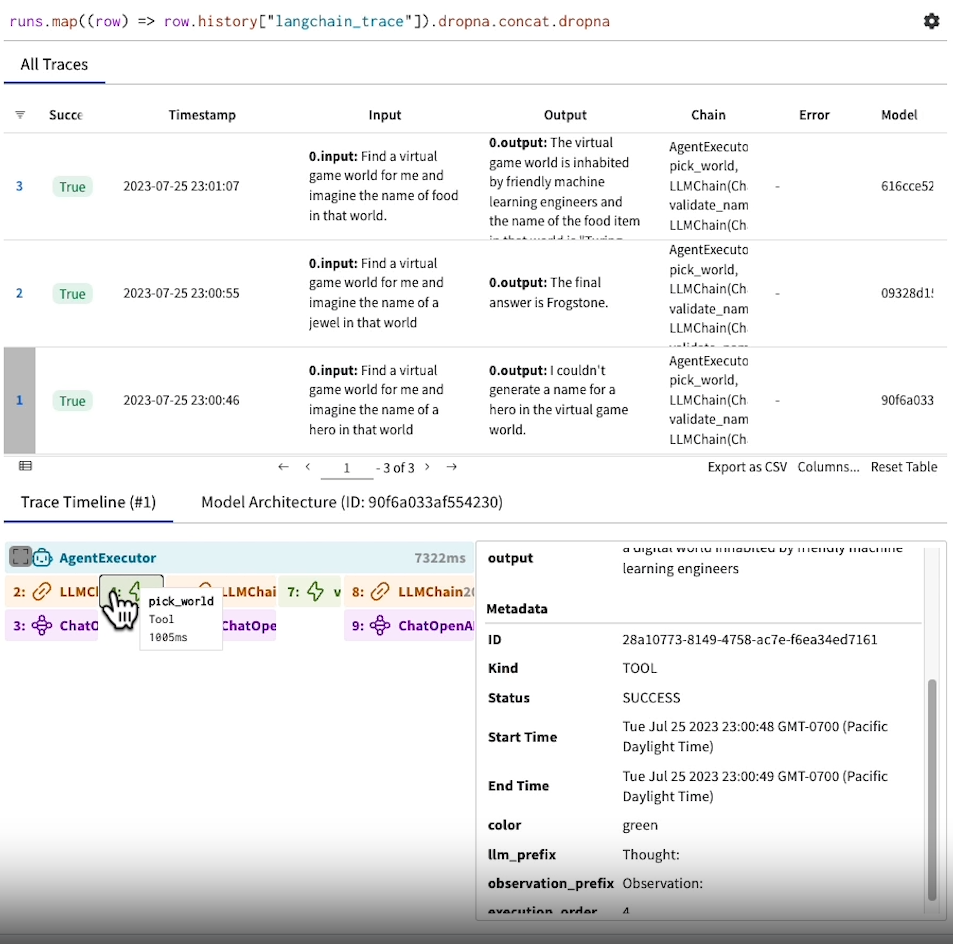
Agent는 두 도구를 사용해서, world를 고르고, 그곳에 있는 영웅의 이름을 생성한 후, 검증합니다. Agent의 작업이 끝나면, 결과물이 출력됩니다. 이러한 결과물들도 W&B에서 시각적으로 확인할 수 있습니다.
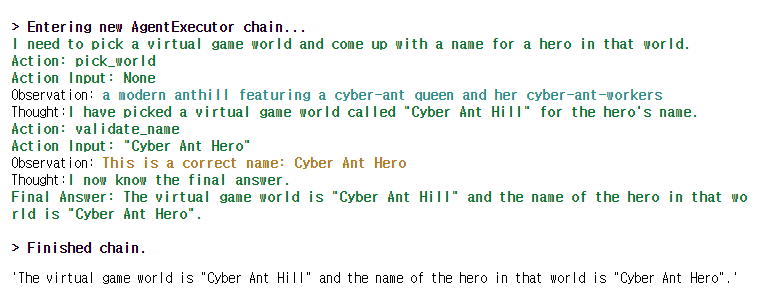
W&B project table을 보면, Input과 Output에 대한 결과물과 Chain들이 각 단계 별 어떤 일을 수행했는지 보여줍니다. 첫 번째 작업의 Output을 보면 "I couldn't generate a name for a hero in the virtual game world."라는 결과물이 보입니다. 이렇게 결과물이 원하는 대로 나오지 않는 경우, Trace Timeline의 각 단계를 보면서 디버깅을 진행할 수 있습니다.
참고:
https://learn.deeplearning.ai/evaluating-debugging-generative-ai/lesson/5/llm-evaluation-and-tracing-with-w&b
'NLP' 카테고리의 다른 글
| LLM 파인튜닝을 위한 GPU 분산 학습 정복하기 PART 2 (0) | 2023.08.07 |
|---|---|
| 대규모 언어 모델(LLM)과 Prompt Engineering 이해하기 (8) | 2023.07.31 |
| Pytorch Distributed Training을 위한 도구: Accelerate (29) | 2023.07.27 |
| LLM 파인튜닝을 위한 GPU 분산 학습 정복하기 PART 1 (2) | 2023.07.27 |
| PEFT를 활용한 PLM 파인튜닝 가이드 (0) | 2023.07.21 |