
1. PART 1에서는...
이 전 포스팅인 Hugging Face Audio Course: 음성 데이터 다루기 - PART 1에서는 오디오 데이터에 대한 소개와 Sampling rate, Aplitude, Bit depth, Waveform 등 오디오 데이터의 개념 설명에 필요한 핵심 키워드를 설명하고, Librosa라는 python 라이브러리를 사용해 오디오 데이터를 시각적으로 Frequency Spectrum, Spectrogram, Mel Spectrogram으로 표현해 보았습니다. 이전 포스팅이 궁금하신 분들께서는 링크에서 확인해 주세요
2. Load and Explore an Audio Dataset
기본적인 오디오 데이터에 대한 개념을 숙지했다면, 오디오 데이터셋을 사용해 여러 실습을 하겠습니다. 오디오, 비전, 자연어처리를 위한 데이터 세트에 액세스 할 수 있는 오픈소스 라이브러리인 Dataset을 사용하여, 오디오 데이터셋을 사용합니다.
먼저 Dataset 라이브러리를 설치해 줍니다. datasets 뒤에 대괄호로 원하는 데이터만 지정해서 설치할 수 있습니다.
pip install datasets[audio]
Datasets에서 MINDS-4라고 하는 오디오 데이터셋을 불러와서 사용합니다. 이 데이터셋은 여러 언어와 방언으로 사람들이 인터넷뱅킹에 대해 묻는 내용이 녹음되어 있습니다. 아래의 코드를 사용해, MINDS-4의 호주(en-AU) 데이터 중 train 데이터만 가져옵니다.
from datasets import load_dataset minds = load_dataset("PolyAI/minds14", name="en-AU", split="train") minds
minds를 출력하게 되면, 아래와 같이 데이터셋의 정보가 출력됩니다. num_rows가 654이니, 해당 오디오 데이터의 총개수는 654개입니다.
Dataset( { features: [ "path", "audio", "transcription", "english_transcription", "intent_class", "lang_id", ], num_rows: 654, } )
minds 데이터셋 중 첫 번째 파일을 확인해 보겠습니다.
first_data = minds[0] first_data
{ "path": "/root/.cache/huggingface/datasets/downloads/extracted/f14948e0e84be638dd7943ac36518a4cf3324e8b7aa331c5ab11541518e9368c/en-AU~PAY_BILL/response_4.wav", "audio": { "path": "/root/.cache/huggingface/datasets/downloads/extracted/f14948e0e84be638dd7943ac36518a4cf3324e8b7aa331c5ab11541518e9368c/en-AU~PAY_BILL/response_4.wav", "array": array( [0.0, 0.00024414, -0.00024414, ..., -0.00024414, 0.00024414, 0.0012207], dtype=float32, ), "sampling_rate": 8000, }, "transcription": "I would like to pay my electricity bill using my card can you please assist", "english_transcription": "I would like to pay my electricity bill using my card can you please assist", "intent_class": 13, "lang_id": 2, }
minds 데이터셋의 첫 번째 파일의 상세한 정보가 출력됩니다.
- path: 오디오 파일의 경로
- audio - path: 오디오 파일의 경로
- audio - array: 1차원 넘파이 배열로 디코딩된 오디오 데이터
- audio - sampling rate: 오디오 파일의 샘플링 속도
- transcription: 오디오 파일의 텍스트 전사 내용
- english_transcription: 오디오 파일의 영어 텍스트 전사 내용
- intent_class: 오디오 카테고리
- lang_id: 언어
여기서 intent_class가 어떤 카테고리인지 숫자를 의미 있는 문자열로 바꾸려면 int2str() 메소드를 사용합니다.
id2label = minds.features["intent_class"].int2str id2label(example["intent_class"]) # Output: "pay_bill"
intent_class 13은 "pay_bill"이라는 카테고리를 나타내는 것을 확인할 수 있습니다.
이 데이터에 대해 오디오 분류기(classifier)를 학습시킨다고 했을 때, 모든 feature가 필요하지는 않습니다. 예를 들어, lang_id는 모든 예제에서 같은 값을 지니고, english_transcription은 transcription과 거의 동일하기 때문에 삭제하는 것이 데이터셋의 크기를 줄이는 효율적인 방법일 수 있습니다. 관계없는 feature들은 Datasets의 remove_columns 메소드를 사용하면 쉽게 제거할 수 있습니다.
columns_to_remove = ["lang_id", "english_transcription"] minds = minds.remove_columns(columns_to_remove) minds
해당 feature들이 제거된 나머지 데이터셋의 feature들이 출력됩니다.
Dataset({features: ["path", "audio", "transcription", "intent_class"], num_rows: 654})
3. Preprocessing an Audio Dataset
Datasets을 이용하여 오디오 데이터를 불러온 후, 모델을 학습시키거나 추론(inference)을 실행하기 위해서는 먼저 데이터를 전처리 해야 합니다. 데이터 전처리는 오디오 데이터 리샘플링, 데이터셋 필터링, 오디오 데이터를 모델의 입력에 맞게 변환하는 등의 과정을 거칩니다.
Resampling the audio data
Datasets의 load_dataset 함수는 Datasets에 있는 오디오 데이터를 published 된 샘플링 속도에 맞춰 다운로드합니다. 대부분의 Pretrained 모델들은 16kHz의 샘플링 속도를 가진 오디오 데이터셋에 대해 훈련돼 있습니다. 따라서 오디오 데이터를 해당 sample rate로 upsampling 혹은 downsampling 해야 합니다.
Dataset의 cast_column 함수는 데이터셋을 불러올 때, Resample 합니다. minds 데이터셋은 8kHz였기 때문에 16kHz로 변환하기 위해 sampling rate를 설정합니다.
from datasets import Audio minds = minds.cast_column("audio", Audio(sampling_rate=16_000))
데이터가 업샘플링되었는지 확인하기 위해 다시 첫 번째 데이터를 불러옵니다.
{ "path": "/root/.cache/huggingface/datasets/downloads/extracted/f14948e0e84be638dd7943ac36518a4cf3324e8b7aa331c5ab11541518e9368c/en-AU~PAY_BILL/response_4.wav", "audio": { "path": "/root/.cache/huggingface/datasets/downloads/extracted/f14948e0e84be638dd7943ac36518a4cf3324e8b7aa331c5ab11541518e9368c/en-AU~PAY_BILL/response_4.wav", "array": array( [ 2.0634243e-05, 1.9437837e-04, 2.2419340e-04, ..., 9.3852862e-04, 1.1302452e-03, 7.1531429e-04, ], dtype=float32, ), "sampling_rate": 16000, }, "transcription": "I would like to pay my electricity bill using my card can you please assist", "intent_class": 13, }
sampling_rate의 값이 16000으로 변경되었고, audio의 array값도 변경되었습니다. 이는 기존에 비해 진폭값들의 개수가 전부 두 배로 늘어났기 때문입니다.
Filtering the Dataset
오디오 데이터의 sampling rate를 변경하는 것 외에도 모델에 오디오 파일의 특정 길이에 맞추어 학습시키는 경우도 존재합니다. Datasets의 filter메소드에 필터링 로직을 짠 함수를 넣어 수행할 수 있습니다.
먼저 오디오 샘플이 20초보다 짧다면 True, 그렇지 않다면 False를 반환하는 함수를 작성합니다.
MAX_DURATION_IN_SECONDS = 20.0 def is_audio_length_in_range(input_length): return input_length < MAX_DURATION_IN_SECONDS
오디오 파일의 트랙 길이를 구한 후, duration이라는 새로운 컬럼을 만들어 저장합니다.
# use librosa to get example's duration from the audio file new_column = [librosa.get_duration(filename=x) for x in minds["path"]] minds = minds.add_column("duration", new_column)
Dataset의 filter 메소드에 작성했던 함수와, duration 컬럼을 넣어, 오디오 데이터가 20초보다 길다면 filtering 합니다.
# use 🤗 Datasets' `filter` method to apply the filtering function minds = minds.filter(is_audio_length_in_range, input_columns=["duration"]) # remove the temporary helper column minds = minds.remove_columns(["duration"])
Pre-processing Audio Data
이처럼 오디오 데이터를 모델의 입력으로 넣으려면, 모델의 sample rate를 변환하거나, 트랙 길이를 자르는 등의 전처리 과정이 이루어집니다. 사전 학습된 모델들에 오디오 데이터를 넣을 때의 전처리 과정에서 요구하는 사항들은 모델마다 다릅니다. Transformers는 지원하는 모든 모델에 대해 원시 데이터를 원하는 입력 feature로 변환하는 feature extractor 클래스가 제공됩니다.
일반적인 feature extraction 변환을 위해 Whisper의 feature extractor를 살펴보겠습니다. Whisper는 자동 음성 인식(ASR)을 위해 사전 학습된 모델로 2022년 9월에 OpenAI의 Alec Radford와 공동 연구자들이 발표했습니다.
첫 번째로, Whisper의 feature extractor는 모든 데이터가 30초의 길이를 갖도록 덧붙이거나(pad) 자릅니다(truncate). 30초 보다 짧은 데이터는 시퀀스의 끝에 0을 붙여 길이를 늘립니다(오디오 신호에서 0은 신호 없음 혹은 무음과 같습니다). 30초 보다 긴 데이터는 30초가 되도록 자릅니다. Whisper feature extractor가 수행하는 두 번째 작업은 덧붙여진 오디오 배열들을 로그-멜 스펙트로그램으로 바꾸는 것입니다. 아시다시피, 이 스펙트로그램은 신호의 주파수가 시간에 따라 어떻게 변하는지를 멜 스케일에 맞춰 데시벨(로그 부분)로 측정하여 주파수와 진폭이 사람의 청각 시스템을 더 잘 표현하도록 합니다.
이 두 작업은 transformers의 WhisperFeatureExtractor로 적용될 수 있습니다.
from transformers import WhisperFeatureExtractor feature_extractor = WhisperFeatureExtractor.from_pretrained("openai/whisper-small") def prepare_dataset(example): audio = example["audio"] features = feature_extractor( audio["array"], sampling_rate=audio["sampling_rate"], padding=True ) return features
Datasets의 map 메소드를 이용하여 모든 학습 데이터에 적용시킵니다.
minds = minds.map(prepare_dataset)
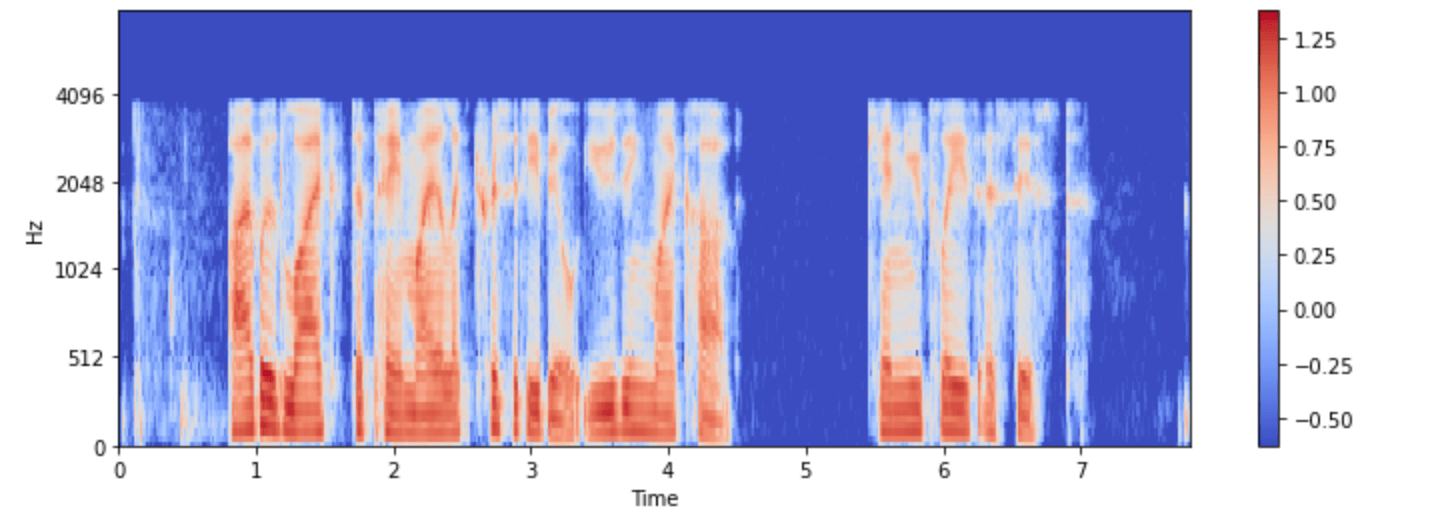
해당 데이터를 시각화해봅니다.
import numpy as np example = minds[0] input_features = example["input_features"] plt.figure().set_figwidth(12) librosa.display.specshow( np.asarray(input_features[0]), x_axis="time", y_axis="mel", sr=feature_extractor.sampling_rate, hop_length=feature_extractor.hop_length, ) plt.colorbar()
4. Streaming Audio Data
오디오 데이터셋을 다룰 때 작은 크기의 데이터셋을 다룰 때는 문제가 되지 않지만, 몇 시간 혹은 몇 백 시간의 오디오 데이터셋은 많은 크기의 저장용량을 요구합니다. 이때 Datasets의 Streaming Mode는 저장 공간의 제약 없이 모델을 학습할 수 있게 도와줍니다.
스트리밍은 모든 데이터셋을 한 번에 다운로드하는 것이 아닌, 데이터가 필요할 때마다 하나씩 불러옵니다. 따라서 저장공간의 제약 없이 임의의 크기의 데이터셋을 다룰 수 있습니다. 또한 스트리밍의 경우, 처리와 불러오는 것이 즉석에서 이루어지기 때문에 데이터가 준비되는 대로 시작할 수 있습니다. 또한 전체 데이터셋을 사용하여 훈련하기 전에 임의의 몇 개의 데이터로 훈련이 잘 진행되는지 확인해 볼 수도 있습니다.
데이터셋을 불러올 때 load_dataset 함수에 streaming을 True로 설정하면 스트리밍 모드를 활성화시킬 수 있습니다.
gigaspeech = load_dataset("speechcolab/gigaspeech", "xs", streaming=True)
하지만 스트리밍 모드는 데이터 처리를 할 때 데이터를 확인했던 방법처럼 더 이상 파이썬 인덱싱으로 데이터에 접근하지 못합니다. 대신 데이터를 순회하여 접근하는 방법으로, 데이터에 접근할 수 있습니다.
next(iter(gigaspeech["train"]))
참고:
https://huggingface.co/learn/audio-course/en/chapter1/load_and_explore
Load and explore an audio dataset - Hugging Face Audio Course
Unit 0. Welcome to the course! Unit 1. Working with audio data Unit 2. A gentle introduction to audio applications Unit 3. Transformer architectures for audio Unit 4. Build a music genre classifier Unit 5. Automatic Speech Recognition Unit 6. From text to
huggingface.co
'ASR' 카테고리의 다른 글
| Hugging Face Audio Course: 오디오 처리를 위한 Transformer 구조 (0) | 2023.08.28 |
|---|---|
| Hugging Face Audio Course: Pipeline으로 Audio Application 쉽게 만들기 (16) | 2023.08.01 |
| Hugging Face Audio Course: 음성 데이터 다루기 PART 1 (0) | 2023.07.24 |
| 음성인식 개발자를 위한 영어 발음 사전 제작 프로젝트 2편 (0) | 2023.07.24 |
| 음성인식 개발자를 위한 영어 발음 사전 제작 프로젝트 1편 (0) | 2023.07.21 |